If you have a blog, and it’s actively making you money (or your goal is for your blog to eventually make you money), it’s common sense: you should know how to copyright your blog. Or, rather, how to register the copyright for your blog.
But why? After all, the moment you publish something online, it belongs to you. It’s automatically copyrighted.
Well, yes, but this automatic copyright does you no good in a court of law because it’s not registered.
If someone takes your material and sells it without permission, you can’t file an infringement lawsuit unless your material is already registered with the U.S. Copyright Office.
And, if you register your copyright within three months of your work’s publication–or before someone steals it–you, the copyright owner, are “eligible for statutory damages, attorneys’ fees, and costs.” This is the worst-case-scenario outcome you’re looking for.
At IPHQ, we believe knowing how to copyright your blog should be common knowledge. It seems like a complex process, but it doesn’t have to be–so we’re taking you through it, in 6 simple steps.
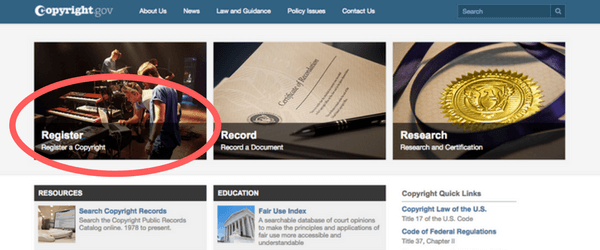
STEP 1: Log into the Electronic Copyright Office (eCO) registration website
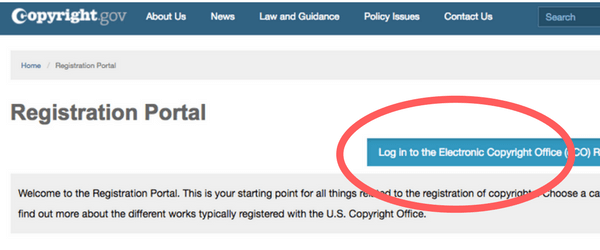
First, you want to visit the official US Copyright Office website. Go to copyright.gov and click the giant “Register a Copyright” button, and then the blue “Log In To The Electronic Copyright Office (eCO) Registration System” button.
If you’re a new visitor, you’ll need to register. (If you’ve registered copyrights before, you can go ahead and log in with your old information.)
Registration takes approximately 30 seconds. There will be two screens–the first has you fill in your name, email address, username, and a password. (IMPORTANT NOTE: passwords require 2 capitalized characters, 1 number, and 1 special character.)
On the second registration screen, you fill in your postal address, phone number, and preferred contact method.
This registration process makes Step 4 way easier. For a few of the screens, you can simply click “Add Me” instead of typing in your personal information over and over.
STEP 2: Choose new claim registry
Select “Register a new claim” under “Copyright Registration” on the left-hand side of the screen. An easy, quick step–you can do it without blinking!

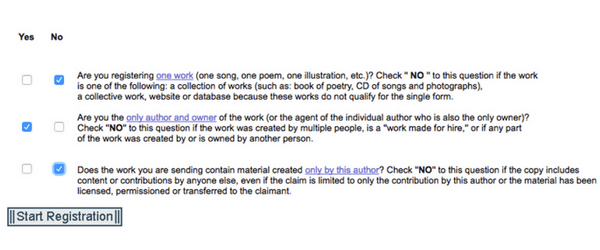
STEP 3: Answer the preliminary questions
You’ll see three questions before you start your registration.
1. Are you registering one work?
If you’re registering an entire blog (which you probably are, if you’re reading this post) then the answer is NO.
2. Are you the only author and owner of the work?
If it’s your blog, and you share it with nobody else, then your answer is YES.
3. Does the work you are sending contain material created only by this author?
If you have guest posts on your blog, which is fairly common, then your answer is NO. If you have absolutely zero guest posts, the answer is YES.
STEP 4: Complete the eCO checklist (12 screens)
The left side of the eCO (electronic copyright office website) will show you a checklist. We’ll walk you through each screen–no need to feel intimidated.
1/12: Type of Work
For a group of blog posts, you’ll pick “Literary Work.” These terms are supposed to be pretty broad–the copyright website mentions that computer programs can also be categorized as “literary works.” Don’t fret that it’s not a novel–trust me, your blog counts.
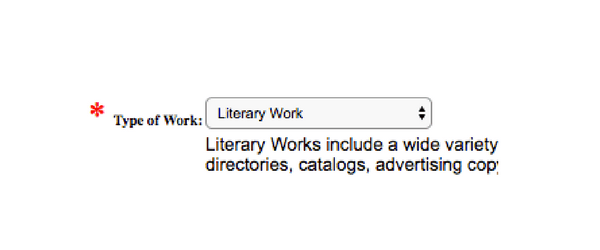
Click the box underneath that says you read and understand the description, and click “Continue” at the top of the page.
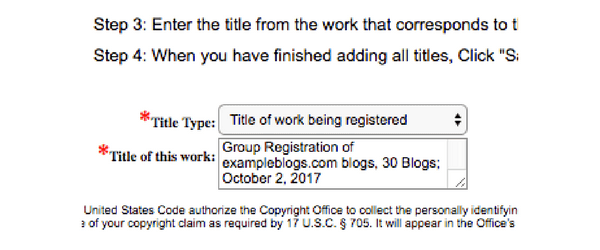
2/12: Titles
This is where you’ll enter the title of your blog as a whole, and also the titles of each of the individual blogs.
First, click “New.” Then, under “Title Type,” select “Title of Work Being Registered.”
Enter the title of your blogs as a whole underneath. We suggest you use this naming convention:
Group Registration of [blog site url] blogs, [# of Blogs]; [Publication Month and Year]
Example: Group Registration of intellectualpropertyhq.com blogs, 12 Blogs; July 2017
Click “Save,” and then click “New” to start naming your individual blog posts.
Under “Title Type,” select “Content Title,” and name your first blog post with the following naming convention:
[FileName], Date of Publication
Example: IPHQ Blog 1; July 13, 2017
Click “Save,” and repeat the “Content Title” step until each blog title for your group has been entered. Click “Continue.”
These blog titles don’t have to match the titles on your site, but they DO have to match the names of the files that you upload in Step 6.
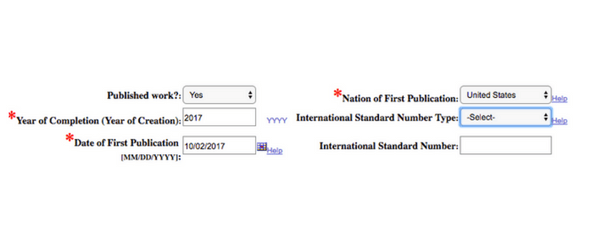
3/12: Publication/Completion
This is where you confirm that your blog has been published.
Answer “Yes” under the “Published Work?” question. Then fill out the nation of first publication, year of completion, and date of first publication.
Click “Continue.”
4/12: Authors
If you’re the author, this is where the “Add Me” button comes into play! It’s up near the top of the page. Click it, and click “Save.”
If you’re adding someone else, click “New,” complete the required info, and click “Save.”
Then, check the box that says “Text” under “Author Created,” and click “Save.”
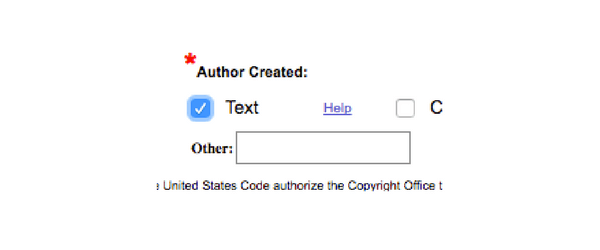
If there are more authors you need to add, repeat that step. Otherwise, click “Continue.”
5/12: Claimants
If you are the author and owner of your blog (which you should be), click the “Add Me” button at the top, and click “Save” and “Continue.”
6/12: Limitation of Claim
If your blog doesn’t contain any preexisting material (i.e. articles that have already been published elsewhere), click “Continue.”
7/12: Rights & Permissions
We recommend you skip this step because any info you provide here will become public knowledge–so you’ll be a target for spam. Just click “Continue.” Nobody needs more junk mail in their life.
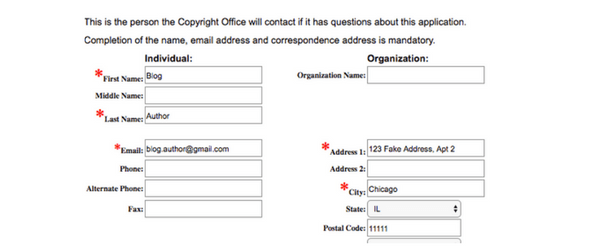
8/12: Correspondent
THIS section, on the other hand, is incredibly important to complete, because it ensures that someone from the US Copyright Office can contact you if they have any questions.
You can click “Add Me,” or enter the information manually. Click “Continue.”
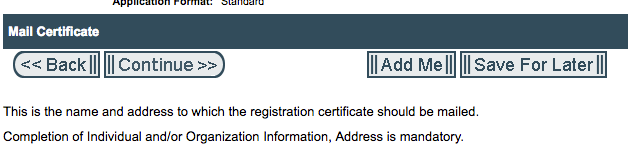
9/12: Mail Certificate
This is where you’ll get your certificate mailed. If the address you used in your registration is your mailing address, click “Add Me.” Otherwise, enter the mailing address you want and click “Continue.”
10/12: Special Handling
Special Handling is optional–this is another screen we recommend you skip. Click “Continue” without filling anything in.
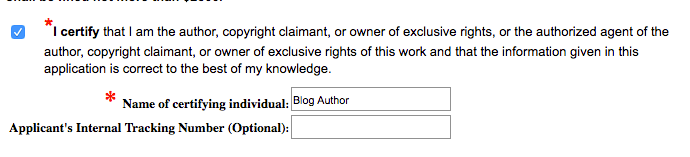
11/12: Certification
Click the box to certify that you are the copyright owner, enter your name, and click “Continue.”
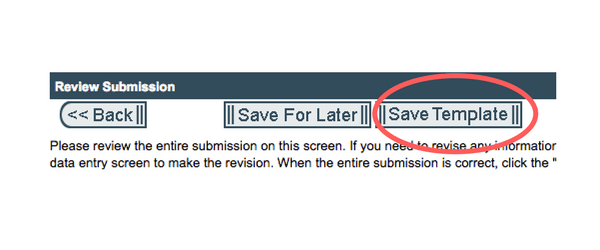
12/12: Review Submission
Look over your submission for any errors–make sure all the items in the checklist are checked off. If you find any issues, go back and fix them.
Before you submit, click “Save Template,” and rename the template title to “Blog Post Template”–this will save you time when you register blog posts in the future! Click “Save.”
STEP 5: Buy your copyright
Whew! Registration almost finished. Now you need to pay for your copyright registration. Click “Add to Cart,” and check to make sure you have 1 item in your cart. It should cost $55.
Click “Checkout” at the top of the page, and enter your payment info.
STEP 6: Upload the content you want to register
Your final step in registering your content with the US Copyright Office is to upload the files, so they know what exactly you’ve registered.
Reminder: your uploaded files should have the exact same names as the Content Title names you entered on Screen 4:
[FileName], Date of Publication
Example: IPHQ Blog 1; July 13, 2017
Once everything is uploaded, click “Complete.”
You know how to copyright your blog–so what’s next?
Is registering your blog copyright a good idea for you, specifically? We say yes! Here’s why:
1. Your hard work should stay tied to you. If you’re spending the time to compile data and information, do original research, and create unique blog posts, then you should take an extra step to protect it–to ensure that it stays yours.
Knowing how to copyright your blog is the best first step in making sure you get to keep all the rights and privileges that come from making original content.
2. It works best if you register your copyrights once a quarter. You CAN do a group registration once a calendar year, but it’s a better idea to do the registration once every 90 days. So, every 90 days, starting from the creation of your blog.
We know–that’s $55 a quarter, which breaks down to a little over $18/month.
It’s not FREE…but it’s about the price of a Netflix subscription + a latte and a scone. If you have the extra $18 to spare, this is a worthwhile investment. Remember: you’re investing in you, and the protection of your material.
If you want this info in a handy PDF, click here. And feel free to leave a comment if you have any questions!
Photo Credit: Mikayla Mallek on Unsplash